


A brief Filestash review
Filestash (GitHub, docs) is a one size fits all, yet customizable, yet functional out-of-box solution for web-based file browsing. I’ve been looking for a long time for a fast and functional product to solve that very problem, and so far not had to look any further. As someone that has heavily used Nextcloud, and eventually got used to its quirks, many bugs, and general slowness, having a piece of software that doesn’t get in my way and works really fast is a particular godsend.
Navigating files is easy, fast, and comprehensive. It feels as responsive as a native file browser, and since it’s delivered as a single-page app, there are no pesky page loads or refreshes between directories. As expected with such brisk navigation, it’s also easy to share, upload, move, and delete files, with multi-select and drag-and-drop interface where even the breadcrumb can be used as a drop target. Very smart design.
Now, while it’s good, it’s not perfect, and there are features missing that other products like Nextcloud Files offer. For example, there is no “clipboard” interface that you can copy files to so that you can navigate to another directory and paste without a drag operation. This also means that sometimes you might need to drag a bunch of files into a parent directory before then dragging them into subdirectories level by level. Perhaps there’s a way around this, but if there is I haven’t discovered it yet.
There are also a few bugs—one of which restricts me from completely replacing Nextcloud for the time being. I do very much want file sync to my clients, and WebDAV is generally the way to go for that without requiring yet another service installed on the host.
But aside from those few issues, in terms of its looks and general function, it’s otherwise an excellent experience. The demo is probably the best way to get acquainted.
Now, you may notice in the demo that Filestash is designed primarily as a user-initiated tool, whereby the user selects the desired service type, provides the service URI/path and login information themselves, and begins and ends their session manually. However, this is not the only way it can be used, since it is designed to be operated both standalone and as middleware. Filestash configuration is primarily centered around plugin abstraction that allows you to fully customize and tailor the relationship Filestash has with your files.
My use case for Filestash
My ideal use case, with regard to using Filestash to replace Nextcloud, involves logging in with SAML and redirecting the user to their personal files on the local system. However, SAML and other federated authentication is as of this writing locked behind a paid subscription, and such a cost is not feasible with the few number of users (including myself) that I support. After speaking to Mickael, the author of Filestash, a more affordable license is under consideration, but there is no ETA as of this writing.
Before I continue, I want to remind you that the creator of Filestash is a real dude that puts a lot of effort into the program for not much monetary gain. I would encourage any enterprise that is looking to use Filestash to not be stingy and spend a little extra money on the Pro or Enterprise editions—you know you have the funds, don’t lie. It’s cheap compared to whatever vendored nonsense you already pay for.
But for me, since there is no affordable license available, I did what I do best: break shit. I looked at how Filestash authenticated and, without needing to rebuild it, managed to shim my own proxy-based authentication in using Nginx as a foothold. The rest of the article will focus on this topic. If this doesn’t interest you but Filestash does, just go try it yourself and check the code to see if it’s a project you’d like to support. There’s good stuff happening and I can see the project going places—but if you don’t care how the project is going and just want something that works, I can at least vouch for that much. And if you use a different proxy other than Nginx, uhh… I’m sorry?
Authenticating with Filestash using Nginx
For reference, I use authentik, but any backend authentication provider or other source that can make its values available to Nginx (be it upstream proxy headers, auth_request, njs, some other module or what have you) can use this method. The important part is that we can redirect the user to send a POST to Filestash to authenticate on their behalf, using whatever information we have or can acquire.
This all sounds good in theory… and while there isn’t much hackery necessary to get it to work, and the resulting process isn’t that egregious, I still hate this kludge with a fiery passion. There is probably some way to get this to work with the API, but I can’t be arsed to figure it out; it probably wouldn’t work with bare Nginx like I have now, and would require some extra tooling, so whatever.
Necessary information
Our first step is figuring out how users will authenticate with Filestash—which is to say, its storage backends. Filestash offers dynamic, plugin-driven login forms that collect information to pass to the storage backend, so what information you can pass to it does depend on the structure of these forms. It is best to set up a copy of the backend beforehand, with the reasoning being twofold: to inspect the form used on the login page, elucidating what kind of fields it needs and how they are used; and to test logins with known-good information.
The username and other descriptory information
Most storage backends need basic, non-secret information, such as the username or root directory, in order to build a functioning session. Often times this information can be stored in the attribute mappings for the backend in Filestash; other times it can be provided statically in the Nginx config or passed to Nginx via another source, before then being passed to Filestash, and as such the storage backend.
If you will be giving all users access to the same files and as such use the same username/other information regardless of who is logging in, or if such attributes are otherwise not required by the chosen backend (e.g. with local’s password_only strategy), you should be able to safely ignore such fields.
The password and other secrets
All backends require at least one password or other secret in order to authenticate the user—even the local backend, which uses the Filestash admin password. Generally, you want to ensure that Nginx, Filestash, and the storage backends all have access to said secret, be it the user’s personal password provided in a request, a code generated at runtime, or some static value that can be passed around.
While you can enter the password or other secrets for your backend into the attribute mapping—and there is no problem doing that with non-secret information—I would highly recommend that you do not, and instead pass it via Nginx as we will cover below. If anyone were to gain access to your unproxied Filestash endpoint and visit the unmodified login page, they would be able to log in as any user to your backend since you already provided the secret(s) in the login form by default. Keeping the password either in your Nginx config, or passed to Nginx via authentication provider or other source, means that Nginx and only Nginx can authenticate with the backend. Having the secret passed between Nginx and Filestash is significantly less risky for this reason.
Configuring your backend
Static values
Static information can be stored inside Nginx configuration and passed to Filestash, which Filestash can then pass to the backend. The most immediate use for this outside of file/mount paths and other connection information, is shared secrets. Since we are trying to authenticate real people, it could be assumed that the backend requires their password—but this is not something the SSO should have access to in plaintext, so the second best choice is to configure the storage backend to accept a shared secret known only by the server. There are a few ways you can configure your backend to accommodate this:
- Authenticate to the backend with one administrative user that has access to all user files
- If you are using local storage like I am, your shared secret in this case will be your Filestash admin password, so be sure to safeguard it
- Other storage providers like S3 may require API keys or other non-user credentials; the same caution should be taken as with the Filestash admin password above
- Create shim users, perhaps with a unique prefix or suffix, that all use the shared secret as their password, and either apply the same permissions as or map the login directly to the the regular user
- Apply the secret to your security configuration so that all authorized users can log in using that secret in addition to their personal password—OpenLDAP and Dovecot can do this for example
Dynamic values
Dynamic information, such as user passwords or keys, can be provided by the user to the authentication provider or other system that can pass information to Nginx, rather than it being stored the Nginx config. Otherwise, the process is the same as with static secrets above. How to configure that with Nginx is a bit different however:
- An authentication provider can pass the user’s password, a stored token known only by the provider and storage backend, or code generated at runtime by the provider to Nginx via
auth_requestor similar directive, which can then be passed to Filestash and thus the storage backend - An API or other source can be queried using
proxy_pass,fastcgi_pass, or other method—however, you won’t be able to collect user information unless the source provides a login page; or you override the existing Filestash API login request with Nginx, send that information somewhere else, and then internally redirect to the API login URI and bypass your override
Pros and cons
I did not use dynamic secrets in my setup and relied fully on authentik, so I will not be covering the configuration of such here, but I imagine it would work similar to how I described above. However, doing it that way presents a larger threat landscape for secret exposure, as the secret must pass from your authentication provider or other source to Nginx to Filestash. if it’s plaintext user passwords being sent through, that makes it even worse. Of course, using a static value that any user can log in with is also bad, since if that value were to be exposed, all user data would be at risk all at once.
But at the end of the day, none of these hacky suggestions are particularly secure, and if security and stability is your goal, using the API or creating your own plugin is probably the better option.
Still, we’re here to break shit, and presumably you are too, and understand the implications of doing so. Caveat emptor.
Configuring the storage backend
Once you have your authentication worked out and made sure the backend can be logged into normally, we need to create a new storage backend configuration and passthrough authentication middleware in the Filestash admin center.
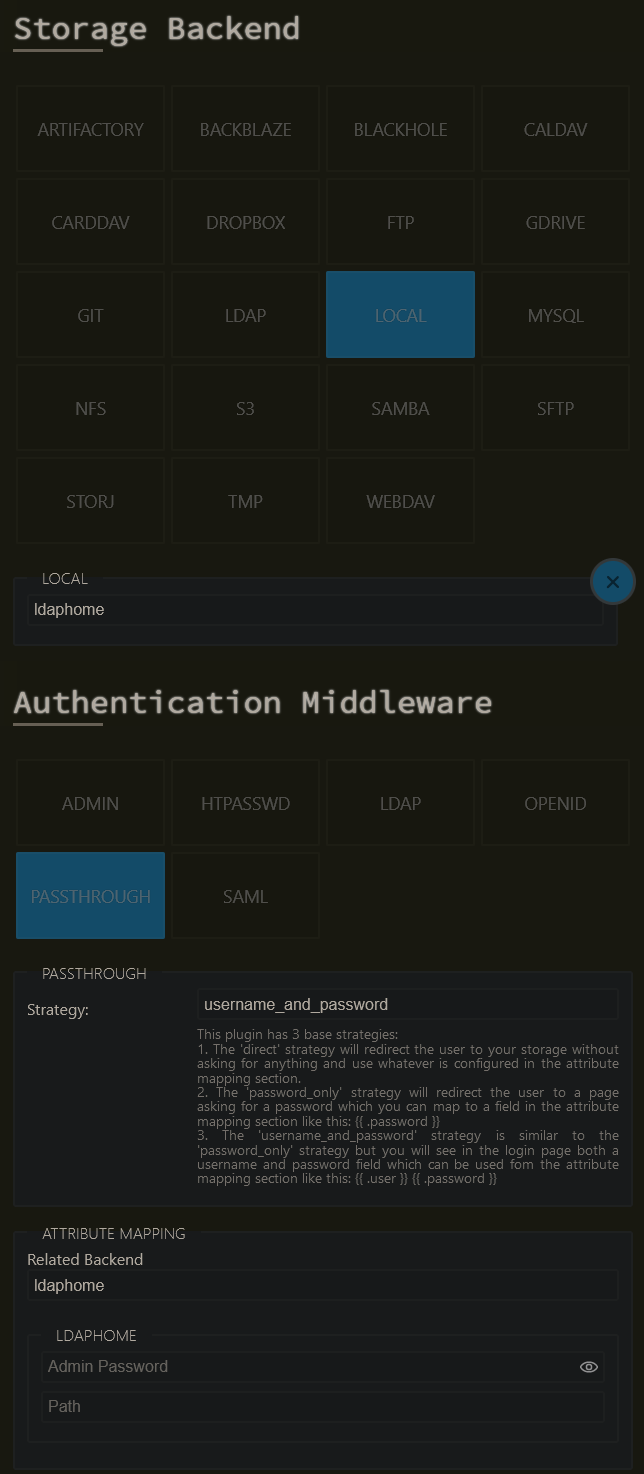
For the local backend, I configured mine with the username_and_password strategy, as each of my users has a directory dedicated to them; your configuration may vary depending on your chosen backend and required form fields.
My attribute mapping looks like this:
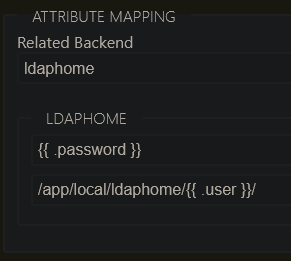
This has the effect of taking whatever was put in the password field in the login form and matching it against the admin password, and injecting the username into the desired path. The password is static and provided by Nginx, while the username is dynamically set using the X-Authentik-Username header returned from the authentik auth_request in Nginx. My path looks like the because I run Filestash via Docker and mount the files through a bind mount. Your path will be different.
If the user is able to log in with their own crafted username, either through account creation in your authentication system or via unproxied access, and you use the username in a file path like in this example, they may be able to gain access to other parts of the filesystem by providing e.g. ../../../home/someuser/yourfiles as a username. If you cannot sanitize user input via a Nginx module or additional proxy call, try to at least do so in your authentication solution.
Note that using a static secret known only by the proxy and the backend prevents this exploit via the unproxied endpoint.
Running Filestash as a separate user and configuring proper filesystem permissions should help prevent unauthorized access to sensitive files. While running in Docker with an unprivileged user (either by changing the user, user namespaces, or both) with only intentionally exposed files mounted in the container can help, do not be fooled into thinking Docker is a replacement for proper security practices.
Configuring Nginx
I assume you already know how to use Nginx, and if you don’t, there are plenty of tutorials elsewhere—and I assume that if you aren’t using Nginx, that you are capable of translating these rewrite rules and general logic to your system of choice. Namely, the configuration is made up of a single location block to handle the login, and a rewrite in our main block to send users there; pretty simple.
map $http_upgrade $connection_upgrade_keepalive {
    default upgrade;
    # Use HTTP/1.1 keepalive by setting Connection to the empty string.
    ''      '';
}

server {
    server_name filestash.example.com;

    location / {
        # internally rewrite auth login attempts to our special URI
        # note that named locations don't work with rewrite:
        # https://www.nginx.com/resources/wiki/community/faq/#what-does-this-thing-mean
        if ($request_uri ~ ^/api/session/auth/\?action=redirect&label=) {
            rewrite (.*) $1authentik/?label=$arg_label last;
        }

        # otherwise send to filestash
        proxy_pass http://filestash;
        proxy_set_header Host $host;

        # enable HTTP/1.1 keepalive if available
        proxy_set_header Connection        $connection_upgrade_keepalive;
        proxy_set_header Upgrade           $http_upgrade;

        # ...
    }

    location = /api/session/auth/authentik/ {
        ### authentik-specific config
        # replace this with whatever your authentication system uses.
        # based on https://goauthentik.io/docs/providers/proxy/forward_auth
        auth_request     /outpost.goauthentik.io/auth/nginx;

        # send cookies from successful outpost auth_request back to the client
        auth_request_set $auth_cookie $upstream_http_set_cookie;
        # NOTE: I highly recommend ngx_headers_more module here, to add an
        #       additional cookie on top of whatever else was already being
        #       sent. default headers module may overwrite the old cookies and
        #       this can cause unexpected issues. appending headers was added
        #       to ngx_headers_more module in version 0.36.
        more_set_headers -a "Set-Cookie: $auth_cookie";
        #       ...or use default add_header.
        # add_header Set-Cookie $auth_cookie;

        # assign headers from the outpost to variables
        auth_request_set $authentik_username $upstream_http_x_authentik_username;
        auth_request_set $authentik_groups   $upstream_http_x_authentik_groups;
        auth_request_set $authentik_email    $upstream_http_x_authentik_email;
        auth_request_set $authentik_name     $upstream_http_x_authentik_name;
        auth_request_set $authentik_uid      $upstream_http_x_authentik_uid;

        # provide the headers to the proxy
        proxy_set_header X-Authentik-Username $authentik_username;
        proxy_set_header X-Authentik-Groups   $authentik_groups;
        proxy_set_header X-Authentik-Email    $authentik_email;
        proxy_set_header X-Authentik-Name     $authentik_name;
        proxy_set_header X-Authentik-Uid      $authentik_uid;

        ### filestash proxy
        # connect to the proxy on a specific URI, discard the location above
        proxy_pass http://filestash/api/session/auth/;
        proxy_set_header Host $host;

        # enable HTTP/1.1 keepalive if available
        proxy_set_header Connection        $connection_upgrade_keepalive;
        proxy_set_header Upgrade           $http_upgrade;

        # send the POST to log in, using our authentication info
        proxy_method POST;
        proxy_set_header Cookie ssoref=$arg_label::; # label from redirect
        proxy_set_header Content-Type application/x-www-form-urlencoded;
        proxy_set_body user=$authentik_username&password=admin_password_here;
    }
}
This might seem like a lot for a Nginx novice, but for anyone that has spent some time with the application, it should all make decent sense. Follow along with the comments as they provide significant context, and it’s trivial to look up directives on Nginx’s site by using their handy documentation redirect: https://nginx.org/r/directive_name_here.
Also, please note this config has been vastly simplified for the purposes of demonstration; production Nginx configs should contain plenty more stuff to make them secure and usable. How to do so is out of scope of this article. Google DuckDuckGo SearxNG is your friend. I may attempt to cover such topics in the future. 📑context/💡idea/blog
The most important part of our config is that we hijack the redirect pages used by Filestash that should normally send you to the login page to instead send the user to our own authentication (using auth_request here). From there, we POST to Filestash with our own login form containing the gathered user information. You can see in the last lines where we provide the username and password in a x-www-form-urlencoded body; this is exactly what Filestash does when it logs you in via the UI, we are only automating that process.
My usernames do not contain characters that might mess with the URL encoding in the POST proxy body, but if yours do, you may want to escape it. If this may be an issue for you, you might have to do some wizardry. Illegal characters should, however, not pose any security risk in theory, if everything is set up properly—just break stuff.
Extra configuration
Lastly, I also added the authentik logout URL to my general settings:

This will redirect the user to the authentik logout page (which prompts to log out of all of authentik or log back in to the application) after the Filestash logout page. Thankfully it doesn’t override the Filestash logout so your session is correctly ended in the application, instead of directly shunting you to the provided URL.
Final notes
And that’s it, my honest thoughts about Filestash and how I configured it. I will leave the configuration of whatever authentication system is used/your reverse proxy of choice as an exercise for the viewer. But if you’re looking for auth solutions, I would of course highly recommend authentik. Been using it for years and it’s rock solid. Might write a review of it later. 📑context/💡idea/blog